Showing posts with label home improvement. Show all posts

Tuesday, December 25, 2012

Gallery Wall Update

Gallery walls have been huge in home decor this year! I took my first stab at a Gallery Wall awhile ago, and our wall has been like that since but now it's time for a change. I mean look at the amazing gallery wall in Shelley's House of Smith's home. With those as inspiration, mine needed to be revamped big time.


For my birthday my lovely sister-in-law bought me the amazing pictures I wanted for the guest bedroom revamp, and instead of using them for the guest bedroom I decided they were just TOO good looking to keep in that room! I mean come on....look at them again!


So with that, I decided to make a different gallery wall type thing for our living room. I wouldn't really call it a gallery wall per se, I think it has too much symmetry and is only 5 frames but I still like it.

On the hunt for inexpensive frames I was on my way to TJMaxx but stopped by Garden Ridge just to check it out. I don't go to Garden Ridge typically....actually, I never go there. But for some reason I had a hunch to stop by & Jiminey Crickets I'm stoked I did! I found four silver frames that were perfect for the 5x7 pictures for $5 each; but I took the photos that were suppose to be in the guest bedroom. So now I am going to use the left over frames/photos from the gallery wall in that room {another post}.


This is in our entry way!


In addition to sending the four 5x7 photographs, the seller also sent two 4x6 photographs. I used those in a frame for our entry way, so I can seem them each time I walk in the house. :) So what do you think? I'm pretty happy with it but it takes some getting use to since the previous one had TONS of photos to look at. But I think the new and improved wall has prettier photos!

Monday, November 19, 2012

Entertainment Stand Revamp

While I totally love my decision to re-do the dresser turned entertainment stand for our living room, I have since questioned my decision to paint it the way I did. And while I was evaluating our living room for the pallet wall fail, I kept looking at the entertainment stand over and over again questioning it more. So what would a DIYer do when she's questioning something in her home? Revamp it! ;)

So that's what I did and boy am I glad I did!! I have some left over paint from my guest bedroom revamp {updates on that soon} so I used the same paint on our entertainment stand. Here's the before...


And here's the after!


Wasn't super tough, but it has been a decision I was struggling with because everyone else liked the green. For me though, with our green couches, curtains and green/blue focus wall {previously the fireplace wall} it seemed like too much green. And with my wonderul iKEA coffee table, the white goes very well.

Sunday, October 14, 2012

Pallet Wall FAIL

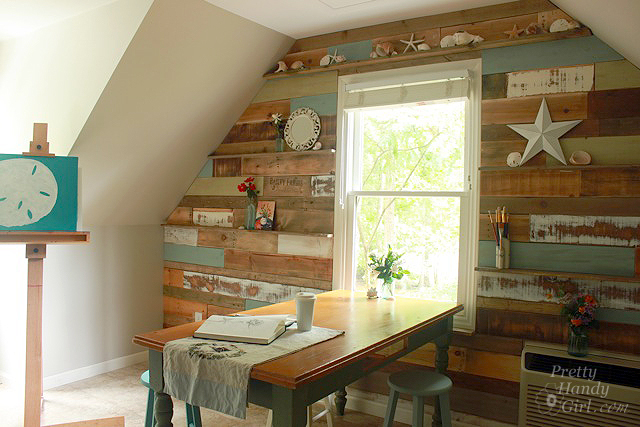
The other day I saw a picture onFacebook from Brittany at Pretty Handy Girl. She posted a blog, and photo, of her AMAZING pallet wall. Here's the pix:


As you can see, totally cute and something that would absolutely appeal to me-right? We have a wooden wall in our house, remember our home was built in the 70s, so this seemed like an easy thing I could put inside my home. I already had green paint from our kitchen, the blue color from our fireplace wall, and white paint for the guest bedroom, so I thought I'd take a stab at recreating this for our home {Ryan was even okay with it, which meant I needed to HOP on it QUICK!}

So I went to labeling some of the wood pieces for the colors I wanted. I thought it would be easier to start painting once I had a game plan of where the colors would go.


Once I did that, I started with the green paint from the kitchen. I got about half way done with the green paint when I stepped back and looked at the whole space.


And that's when I decided the pallet wall was a major FAIL! See, while I LOVE the idea of a pallet wall and the colors, asthetics work perfectly with the home and my style, it just didn't work well with the other patterns inside the space. Given that we have open concept with our living room and dining room next to one another, that means the dining room needs to play nice with the living room.


These are our curtains, slight pattern.

The entertainment stand I painted a while ago.

Rug on top of our carpet.

You might think I'm crazy {and if you do, and strongly believe I made the wrong decision please let me know! I could be airing on the side of caution when I made the choice, but can easily be talked out of it!} but I just didn't think the pallet wall would complement the other pattens in the space. The curtains aren't too crazy, but they do have stripes at the bottom. The entertainment stand has a pattern as well with the green and white on select locations and finally, the rug; which I actually think would complement the pallet wall if it didn't have the other elements.

I don't know....I struggle with mixing patterns and fabrics together in home decor. In apperal I'm all over it but in home decor I doubt myself and decide to opt out. Maybe I'll attempt it again when I'm feeling more confident. Today I'm going to consider it a FAIL! LOL.

Sunday, January 29, 2012

I'm on Organization Over Drive!

January always brings on New Year goals of organization. Add that with the tips I'm seeing on all over the blogosphere and you'll see why I'm feeling the pressure to hop on the ball!

Last year I posted my desire DIY project-the laundry nook. Well, I've avoided it like the plague because it was something I knew needed to get done but wasn't a priority in the grand scheme of things (ceiling repairs, fireplace removal, etc.). However, it's one space that always gets cluttered up since it's hidden behind a curtain (see previous blog post).

I'm not going to settle for that anymore. This time, I'm making steps to make that space suitable for all to see. But most importantly, for me to see! I need a little glam when I do the laundry. :)

So here's before photos of that laundry nook...


And here's my first purchase to help make that space prettier.


I shopped all over the place for baskets, to help make it look like these organized areas but they are just SOO expensive. Plus, with the limited space I have in my laundry area, most baskets wouldn't fit. With the space in between the shelves, I needed something that was 9 inches high and around 11 inches deep that didn't cost an arm and a leg! So I looked at  The Container Store, Target and Walmart. In the end, Walmart had a package of 6 baskets for $35. That's a STEAL! So I ordered two and will have 12 baskets for the space. Plenty for growth!

Additionally, I'm going to put another shelf at the top for those appliances that we don't use very frequently (step ladder will be nearby). All of the articles I've read said to go UP if you don't have space-that's the perfect tip for my laundry nook! Stay tuned for the next update...thinking paint will help spruce that area up! ;)

Tuesday, August 2, 2011

Beautiful DIY Dresser/TV Stand Complete

In my previous post I wrote about my dresser/tv stand purchase and how my tastes were changing. This past Saturday I picked up the dresser and immediately began working on it. It took two days, but its finished! Take a look...

Remember what the before photo looked like:


I'm very pleased with the results. There were so many combinations that ran through our head once we got the colors picked out (which took a while as well). Although it took two days to finish, it really was very easy! I cleaned off the furniture with a Clorox Wipe and let it dry. Then I removed the drawers and handles and placed them on a separate blanket for painting. I used a combination of spray paint and regular paint. The light color is Valspar Ivory and the green is a Valspar Spray Paint called Evergreen. I proceeded to spray paint the green on the stand. Once dried, I taped around the green (on the sides) and painted the ivory. Given the original gold color, this required a couple coats. Then I put a clear coat on it!

I went  to Lowes to look at handles and pulls but I didn't see any I liked that would also match the style of the stand. So I just painted the existing handles. I didn't get 100% coverage (on the inside) but I like the imperfect nature of it. I like the distressed look but didn't incorporate it in this piece, maybe on my next project (I have a bench I'm very interested in painting)!


 Positively Splendid

Friday, July 22, 2011

Eclectic Tastes

I think I may be maturing. Why do I think that you ask? I’m starting to see my tastes change. As we grow older and take on more of life’s experiences obviously we are going to perceive things differently and bring that experience into other areas of our life. Well, I’ve been married for almost four years. Have a precious “baby” Bailey and have lived in our house for close to 3 years. I’m settled into my career and really enjoy what I do. I’m content with my life. And that’s a great thing!
 
So what am I getting at? My comfort in my life is translating into my home décor style. When I first got out of my parents place I brought all new things at a local furniture store. It had to be new and it had to match. After all, this was my first adult-like purchases. We’ve moved several times since then and we’re settled into our home. Now, however, I look at my home and think of ways to personalize it to match our style (that is a perk to home ownership)! Case in point is the Fireplace Reno. We took an unused fireplace and made it useable space by mounting our television on the wall. Adding an accent color to the space and gave functionality to the room. 
    
In my attempt to give New Life to Old Frames I made a collage on my wall. It’s a mix match of frame styles and colors as well as other art pieces arranged in an off-centered manner. The old me would have measured and make sure it was asymmetrical; whereas, the new me loves the eclectic mix. That same diverse mentality has focused on a new television unit. With the television mounted on the wall, I want a new TV stand to sit higher and offer more storage. And no box furniture store unit is going to do! Instead I took to Craigslist (a new found love which I will write more on later) and found this amazing piece…

Ryan is keen on the gold, but we'll see how it works.
Maybe pick up flex from our picture frames!

Yes, it is a dresser but I'm re-purposing it!

Debating on painting the handles to a pewter color. May look sharp!

Look at the amazing detail. Seriously...

Not that great of a picture, but I'm thinking it'll look
perfect in the living room!


I pick it up tomorrow and I am super pumped about it! I love the movement and curves and the antique nature is exactly what I wanted. This piece will give the room character! And for the price, even if the paint is badly chipped and in need of repair I can certainly do that & come well under any entertainment stand I’ve seen in department stores! This is definitely a score for me. 

If I decide to change it up, I'll be sure to post the before & after photos! :)

Thursday, July 21, 2011

Calling all Design Peeps!


In my attempt to give New Life to Old Frames I took two picture frames that I had and painted them a color I thought would look great for my NEW living room space (see Fireplace Reno blog).  So I gave the frames new life and arranged them, with other items, on my wall. I have to say, I’m pretty pleased with the results. But I feel like it’s not done! HELP!


A future DIY project is going to be gluing shells to the glass of some frames, got it from this blog. But do I need something on the right side above my painted frame? I kinda like the off-balanced look, but don’t know if I need to tie into the golden frames on the other side….Thoughts?

Wednesday, July 20, 2011

Fireplace Reno Complete


As I’ve mentioned in my previous blog “Bye-Bye Fireplace” Ryan and I were having work done to our house to get the ugly old fireplace out and finally be able to use that wall! After a week of renovations, the work is complete! Take a look at the changes…

Old Fireplace

NO fireplace! :)


With the placement of the television on the wall, we were able to rearrange the living room and really separate the two spaces (living and dinning areas). I am absolutely in love with the color (thank you Ryan) and am so happy with the results.
 
Next up? We are going to iKea this weekend to see about an entertainment unit. If we can’t locate anything, we’ll (I mean I’ll) be exploring the possibility of built-ins. :) Isn’t being a homeowner grand!

Tuesday, July 12, 2011

New Life to Old Frames

So, I've been into this kick of DIY projects. I'm desperate to try and reinvent something new from something old. I like the fact that it's me doing the decision making, picking out colors and all that jazz. I also even like the "green" aspect with reusing something versus buying something new. I am literally applying that mind-set to various items we need around the house. Case in point....

In my living room are these four picture frames. I stare at them often and lately I have been looking at them and realizing they no longer fit my personality or style. So as Ryan was watching a movie on the couch, I take them off the wall. Pop the pictures and glass out and with a brush and spare can of paint start going to town! You should have seen my husband, he was like "what are you doing NOW?" :) Poor guy, didn't get a say in what I did. I sanded them and committed to changing the look of these frames.

This is me sanding the frames, prep for painting

The before and after
I am even creating a collage of frames that I'm going to partner these "new" frames with. Haven't hung them yet, but will show pictures when I reveal my brand new living room....

Yup, that's right. Tomorrow we'll be breaking ground to a new and improved living room. We are getting the fireplace removed, mounting the television, rearranging furniture and adding an awesome entertainment unit/built-ins! Can't wait to show off the new space. YAY!

Wednesday, January 19, 2011

Bathroom Reno Update

I posted previously on our Bathroom Renovation, which happens to be from my 30 Before 30 List, that we were remodeling our downstairs bathroom. It's been a project on our mind since we bought the house in 2008, but we just received the finances to make it possible. I am pleased to report that this can be checked off my list....
Completed Bathroom

As of this past weekend, our bathroom has been completed! After a LONG week, the work has been completed and we couldn't be happier with the results. The tile work on the floor and the walls is amazing. The Travertine tile is exquisite and the mosaic border adds so much elegance to the room. We decided on a Twilight Mauve paint color to complement the purple/brown mosaic tile which really brings out the purple color. Ryan and I's favorite, dark wood, was present in the vanity and mirror. The space feels HUGE compared to the previous bathroom. I am shocked at how much room we have in there. I literally could not stop looking in the bathroom and find myself opening the door just to gaze at it!

We've made a great decision, increasing the value of our house through a bathroom renovation, which will prove beneficial when we get our home appraised for selling in the future. For now.....we get to enjoy! :)